
The web has transitioned in the past decade from somewhat to secure to much more secure. That is reflected in how many sites now support secure connections (https in your browser location bar). You could see the change as web searches like Google started to use SSL as a ranking signal. One of the big factors was the creation of Let’s Encrypt, a free certificate option that eliminates most of the friction in acquiring SSL for a web site. But not all the friction, as I was recently reminded.
This post is as much a reminder for me the next time I run into this issue as anything. As I tried to remember how I fixed it the last time, I realized it was a much more common issue than I expected. And, as is often the case, there were a variety of solutions.
The problem was this. Let’s Encrypt creates a certificate for your web site. Every three months, the CPanel plugin for Let’s Encrypt runs an automatic update. Normally, the process, called AutoSSL, is successful. The certificate that shows that your site is yours and controlled by you is renewed.
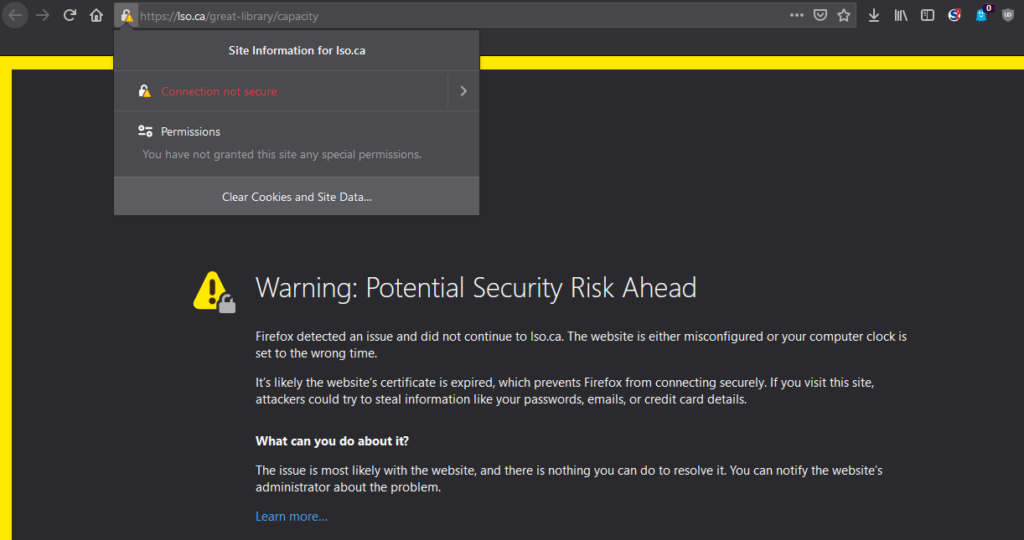
When a certificate is not renewed, it gets out of date. Ironically, this happened to our corporate web site a few weeks ago. When this happens, modern browsers will warn you that there is a problem.
Let’s Complicate Let’s Encrypt
I think it’s only fair to say this up front: Let’s Encrypt is easy. In most cases, it’s set and forget. You will usually get an email when AutoSSL fails but silence is golden. I have a couple of my own sites using it and also implemented it on sites that I consulted on. No problems.
Except when there are.
My site doesn’t connect directly to your browser directly. When you retrieved this page, it went through a proxy controlled by Cloudflare. I highly recommend it. Their site acts as a firewall and content delivery network, reducing the strain on my hosted web site server. They are also my domain registrar.
This is common and is free and easy to configure. You can also ensure that the connection from the visitor’s web browser to Cloudflare and to your server is entirely encrypted.
This is important to know because it means that, when Let’s Encrypt runs, it is running through Cloudflare. And that causes some people problems.
Insufficient Permissions
The error is not very helpful, as is so common. It looks something like this:
MASTER DCV: 403 urn:ietf:params:acme:error:unauthorized
(The client lacks sufficient authorization)
(Invalid response from http://www.ofaolain.com/.well-known/acme-challenge/.......
A 403 error usually means that permissions are blocking access. A common test for this Let’s Encrypt error is to put a file named test.txt into the /.well-known/acme-challenge folder to see if this is real or not. If you can open the test.txt file, then your folder permissions are not actually the problem.
A number of people found that their problem was caused because their .htaccess file included redirects. When a visitor hit the server, the file sent them to some other part of the server than the one they’d requested. This is not unusual; for example, you might use a redirect to capture old urls – http://www.ofaolain.com – and send them to more secure ones – https://ofaolain.com.
But the redirects appear to flummox the AutoSSL process. This means that web hosting companies are allowing the CPanel plugin to auto-configure these .htaccess files with a workaround. The workaround catches the AutoSSL process before it’s redirected.
Here’s what the code looks like:
RewriteCond %{REQUEST_URI} !^/[0-9]+..+.cpaneldcv$RewriteCond %{REQUEST_URI} !^/[A-F0-9]{32}.txt(?: Comodo DCV)?$
or this:
RewriteCond %{REQUEST_URI} !^/.well-known/acme-challenge/[0-9a-zA-Z_-]+$
RewriteCond %{REQUEST_URI} !^/.well-known/cpanel-dcv/[0-9a-zA-Z_-]+$
RewriteCond %{REQUEST_URI} !^/.well-known/pki-validation/[A-F0-9]{32}.txt(?: Comodo DCV)?$
It is placed before every redirect. Each rewrite condition tests to ensure that the request is not (that’s the exclamation point) a domain control validation (DCV) check. If it fails those conditions, then the subsequent redirect command will be executed.
This is seriously kludgy. If your .htaccess has a bunch of redirects, then this 2 or 3 line set of conditions is repeated over and over in the .htaccess file.
My .htaccess file does not have that code. So I attempted to replicate it – just pasting it in to the .htaccess file. But when I re-ran the AutoSSL, it still didn’t take.
Cloudflare Proxy
The last time this had happened – and weirdly, it doesn’t happen with all of the certificates on this same server – I had solved it without touching the .htaccess file. But I was struggling to remember how I fixed it. Then I kicked myself (figuratively) when I remembered.
The Cloudflare connection is a proxy server. It intercepts requests for my web site and acts as an intermediary. Which I knew. But since I was getting a 403 error, I was focused on my end of the transaction, not Cloudflare. I figured that, if it reached my site, Cloudflare couldn’t be part of the problem.
And it isn’t, really. But the proxy is the hitch. I finally tumbled to some old notes and it pointed me to my DNS panel on my Cloudflare dashboard. I went through the DNS entries for the web site for which the certificate had not renewed, and I turned off the proxy.
You are not changing your DNS settings. You are just temporarily disabling the proxy status. Click on the Edit next to the entry you want to change. Click on the orange cloud. It should turn grey and say DNS only. Click Save.
That’s it. You may need to do it for multiple entries – one for each error in your AutoSSL page in your CPanel. Then run the AutoSSL again. In my case, each certificate was renewed. I then returned to Cloudflare, and for each entry, changed the proxy status again (click the grey cloud so it turns orange).
Problem solved for now. As is often the case, I can at least come back to my own blog to find a solution in future! It’s one of those small things that happens so infrequently that it’s easy to forget how to fix it.